ちょっと間が空いたけど、続き。
今日はUndoなどを行うためのボタンを作っていく。
ボタンの描画
ということで、まずはボタンの描画から。
SKSpriteNodeを継承して、ButtonNodeを作る。
//==============================
// YWF
//------------------------------
// ButtonNode.swift
//==============================

import SpriteKit

public class ButtonNode: SKSpriteNode {
  public enum Type {
    case Undo
    case Pass
    case Config
    case Exit
  }

  private static var textures = [String: SKTexture]()

  public class func loadAssets() {
    let atlas = SKTextureAtlas(named: "Button")
    let names = ["UndoButton", "PassButton", "ConfigButton", "ExitButton",
                 "UndoButtonDisabled", "PassButtonDisabled", "ConfigButtonDisabled", "ExitButtonDisabled"]
    for name in names {
      ButtonNode.textures[name] = atlas.textureNamed(name)
    }
  }

  private class func getTextureFor(type: Type, enabled: Bool = true) -> SKTexture {
    var name: String
    switch type {
    case .Undo:
      name = "Undo"
    case .Pass:
      name = "Pass"
    case .Config:
      name = "Config"
    case .Exit:
      name = "Exit"
    }
    name.extend("Button")
    if !enabled {
      name.extend("Disabled")
    }
    return ButtonNode.textures[name]!
  }

  public private(set) var type: Type
  public private(set) var enabled: Bool

  public init(type: Type, enabled: Bool = true) {
    self.type = type
    self.enabled = enabled

    let texture = ButtonNode.getTextureFor(type, enabled: enabled)
    super.init(texture: texture,
               color: SKColor.whiteColor(),
               size: texture.size())

    self.userInteractionEnabled = enabled
  }

  public required init?(coder aDecoder: NSCoder) {
    fatalError("init(coder:) has not been implemented")
  }

  public func enable() {
    self.setEnable(true)
  }

  public func disable() {
    self.setEnable(false)
  }

  private func setEnable(enabled: Bool) {
    if self.enabled != enabled {
      self.enabled = enabled
      self.texture = ButtonNode.getTextureFor(self.type, enabled: self.enabled)
      self.userInteractionEnabled = self.enabled
    }
  }
}
とりあえず描画だけ行いたかったので、実装したのは画像のロードとイニシャライザ、それと有効/無効の切替えだけ。
なので、タッチをされたときの処理はまだ実装していない。
なお、タッチされたときの処理については、SwiftでSetの型パラメータにプロトコルを指定する方法について。 - いものやま。で書いたとおり、オブザーバを登録して、オブザーバに通知を行うことで、外部に委譲させる予定。
ボタンの描画の動作確認
さて、ボタンの描画を確認するために、コントローラを少し修正する。
//==============================
// YWF
//------------------------------
// GameViewController.swift
//==============================

import UIKit
import SpriteKit

class GameViewController: UIViewController {
  @IBOutlet weak var skView: SKView!

  override func viewDidLoad() {
    BoardNode.loadAssets()
    ButtonNode.loadAssets()
    PieceNode.loadAssetsAndCreateTemplates()
  }

  override func viewWillAppear(animated: Bool) {
    super.viewWillAppear(animated)

    var size = self.view.bounds.size
    if UIDevice.currentDevice().userInterfaceIdiom == .Phone {
      size.height *= 2
      size.width *= 2
    }

    let scene = GameScene(size: size)
    scene.scaleMode = .AspectFill

    let backgroundTexture = SKTexture(imageNamed: "Background")
    let background = SKSpriteNode(texture: backgroundTexture)
    background.position = CGPoint(x: scene.frame.width/2, y: scene.frame.height/2)
    scene.addChild(background)

    var board = Board()
    let boardNode = BoardNode(board: board)
    background.addChild(boardNode)
    boardNode.lightUpEnableSquares()

    let upperButtonPositionY = Int((scene.frame.height + boardNode.calculateAccumulatedFrame().height) / 4)
    let lowerButtonPositionY = Int(-upperButtonPositionY)
    let firstButtonPositionX = Int(scene.frame.width / 2 - 20 - 120 - 20 - 60)
    let secondButtonPositionY = Int(scene.frame.width / 2 - 20 - 60)
    let undoButton = ButtonNode(type: .Undo)
    undoButton.position = CGPoint(x: firstButtonPositionX, y: lowerButtonPositionY)
    let passButton = ButtonNode(type: .Pass, enabled: false)
    passButton.position = CGPoint(x: secondButtonPositionY, y: lowerButtonPositionY)
    let configButton = ButtonNode(type: .Config, enabled: false)
    configButton.position = CGPoint(x: firstButtonPositionX, y: upperButtonPositionY)
    let exitButton = ButtonNode(type: .Exit, enabled: false)
    exitButton.position = CGPoint(x: secondButtonPositionY, y: upperButtonPositionY)
    background.addChild(undoButton)
    background.addChild(passButton)
    background.addChild(configButton)
    background.addChild(exitButton)

    self.skView.presentScene(scene)
  }

  // hide status bar.
  override func prefersStatusBarHidden() -> Bool {
    return true
  }
}
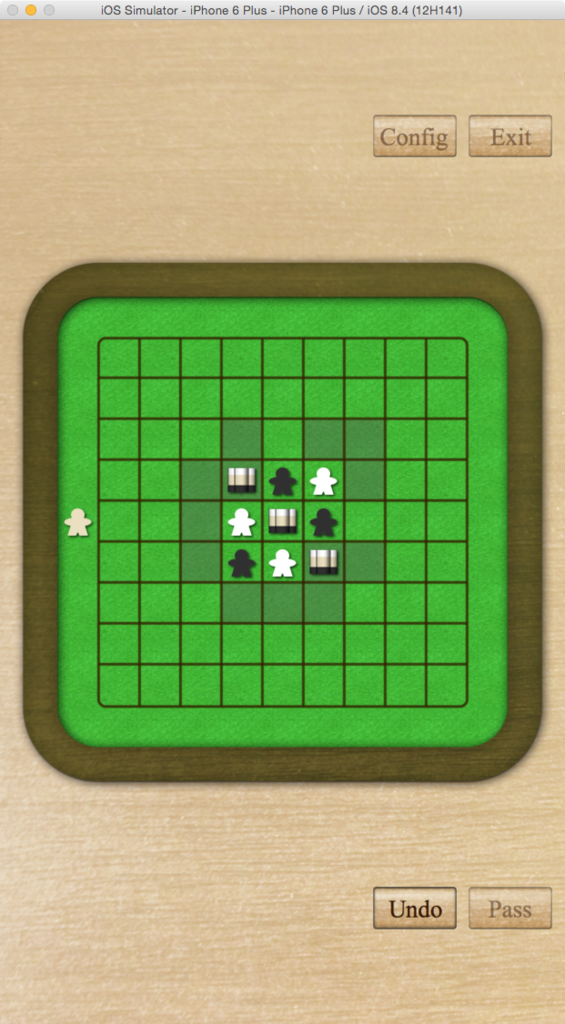
これを実行させると、次のような感じ。
うん、いい感じ――と思いきや、そう上手くいかないのが開発の難しいところ。
他のデバイスで画面を確認してみると、次のようになっている。
iPadやiPhone 5ならまだいいけど、iPhone 6やiPhone 6 Plusになってくると、思った以上にスキマが空いていて、かなり違和感。
一応、ボタンの左側にはプレイヤーの情報を入れる予定だけど、それを入れたとしても、上下のスキマが大きすぎて、よろしくない。
このあたりがiOSでゲームのUIを作るときの難しさの一因になっている気もする。
すなわち、画面のサイズ(もうちょい譲ってアスペクト比)が固定であれば、レイアウトも(比較的)簡単なんだけど、実際にはそうでないので、各画面サイズに適切なレイアウトを用意しなければならなくなっている。
これがドキュメントやデータを扱うアプリであれば、情報を見せる部分のサイズを必要に応じて変えればいいだけなのだけど、ゲームだとそうもいかないので・・・
ただ、iOSはまだマトモな方だと思う。
Androidでの開発を思うと、ゾッとする。
何はともあれ、まずはこのレイアウトの問題を解決していかないと。
今日はここまで!


